The Magic of Toy Rotation, and Your Quickstart Guide!

If you’re a parent you know how quickly toys can get out of hand. And maybe you’re wading through a sea of toys currently, feeling the burden of the plastic and clutter, the frustration of toy rooms looking like war zones. Not being able to take a step without being impaled by plastic pieces. Or are you at a loss for why your kids have hundreds of toys but won’t play with anything for longer than a few minutes? Well science has shown us kids do not do well with an overwhelming amount of choices. When all the toys are out all at once, not only does that make a huge mess BUT your child feels the chaotic energy. They are overwhelmed with choice and move from toy to toy rapidly. So what’s the fix? Toy Rotations!!

Rotating toys in small, manageable groups on a frequent basis takes away that feeling of overwhelm. The toys no longer appear hectic, and by giving them less you allow them the ability focus and play MORE. Less toys also boosts creativity, and has been shown to increase patience.

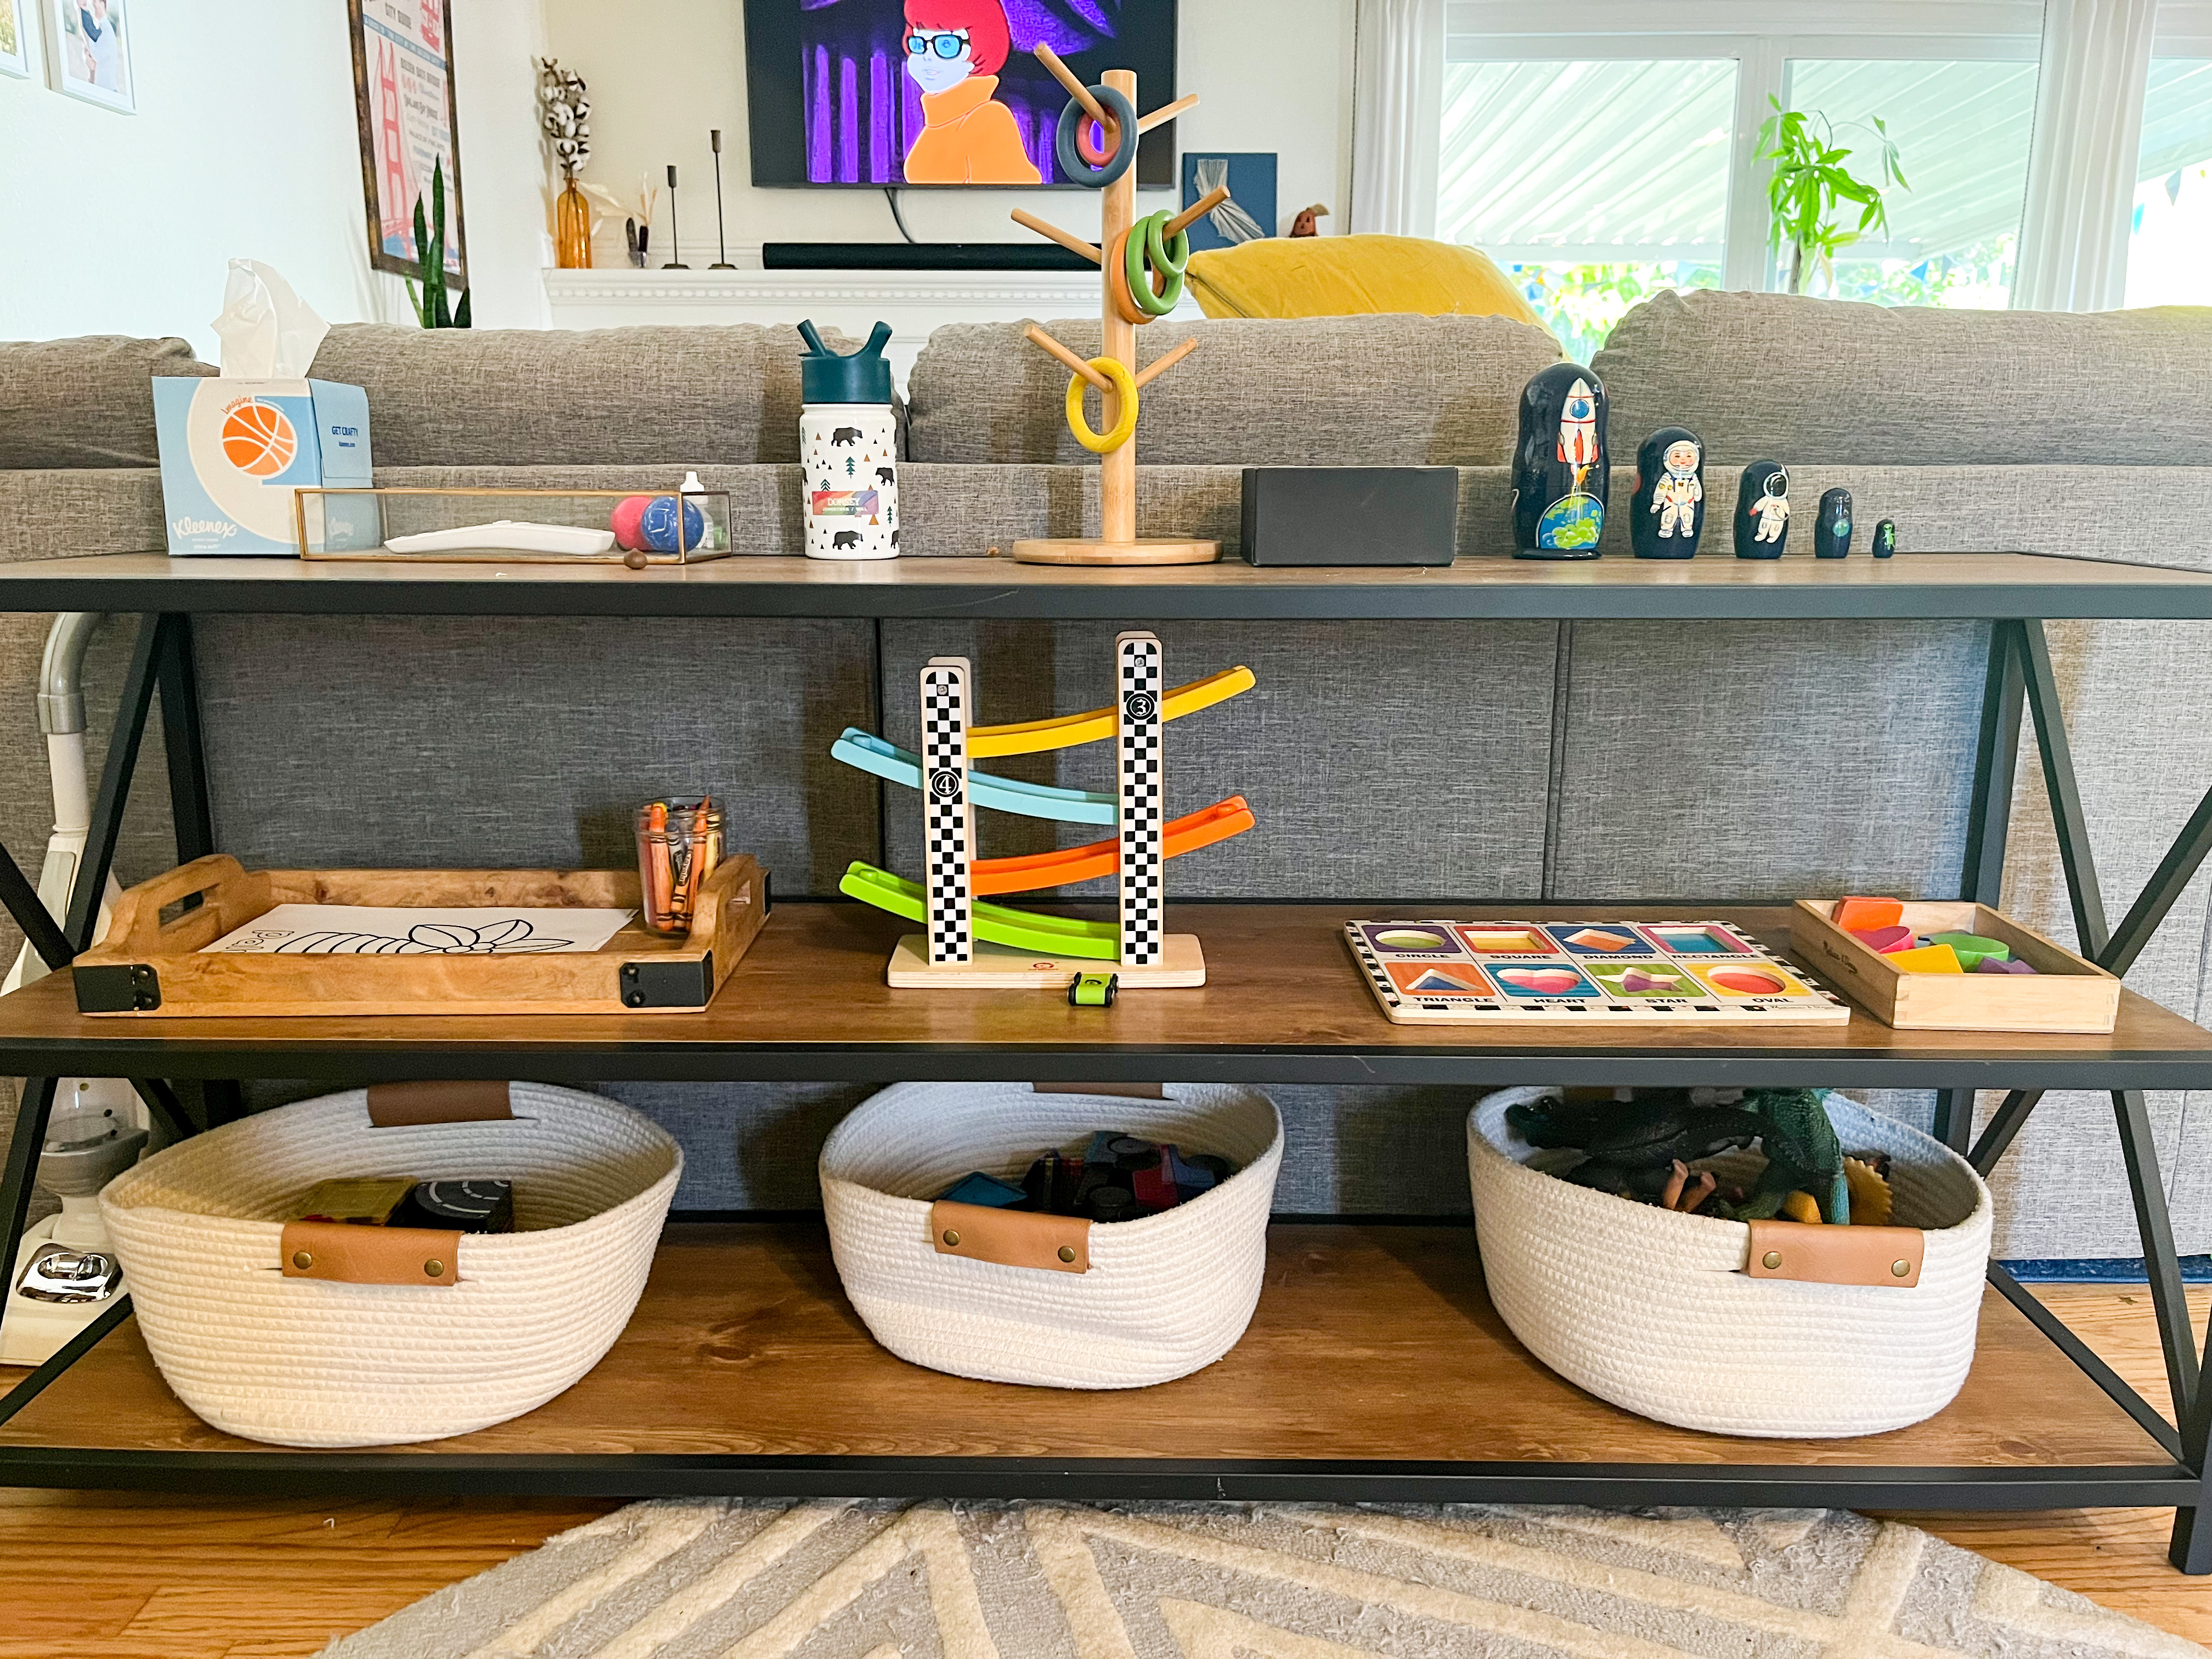
Besides the benefits your kids will get, YOUR life will also change mama!! Toy rotations will drastically improve the clutter and clean up when it comes to toys! We only put out 5-10% of the toys we own. Which means cleaning up takes less than 10 minutes. I have four baskets that hold some combination of vehicles, animals, constructing toys. The boys know each basket is for each thing and then it’s a simple as everyone grabbing a basket and picking up. The remaining items go on the second row of our toy shelf. This is a super manageable and approachable way for kids to clean up. No more feeling like “why bother” or taking an entire weekend to organize / clean your play room.

Where to start?

A starting point is to take inventory of the toys you have and loosely group them into genres. Then try to have one option from each genre available for your child to play with, the genres remain the same but the toys rotate. There is no single perfect way to rotate toys, it will depend on your child and interests and there are no rules when it comes to this. If you don’t have a ton of different vehicles or animals don’t feel like you suddenly have to go out and buy them… just split up the cars you put out and save the second batch for another rotation. Below is a loose frame work so you can get an idea of genres and toys, but it will look different for everyone based on what they have and kids interests.

Bigger Toys:

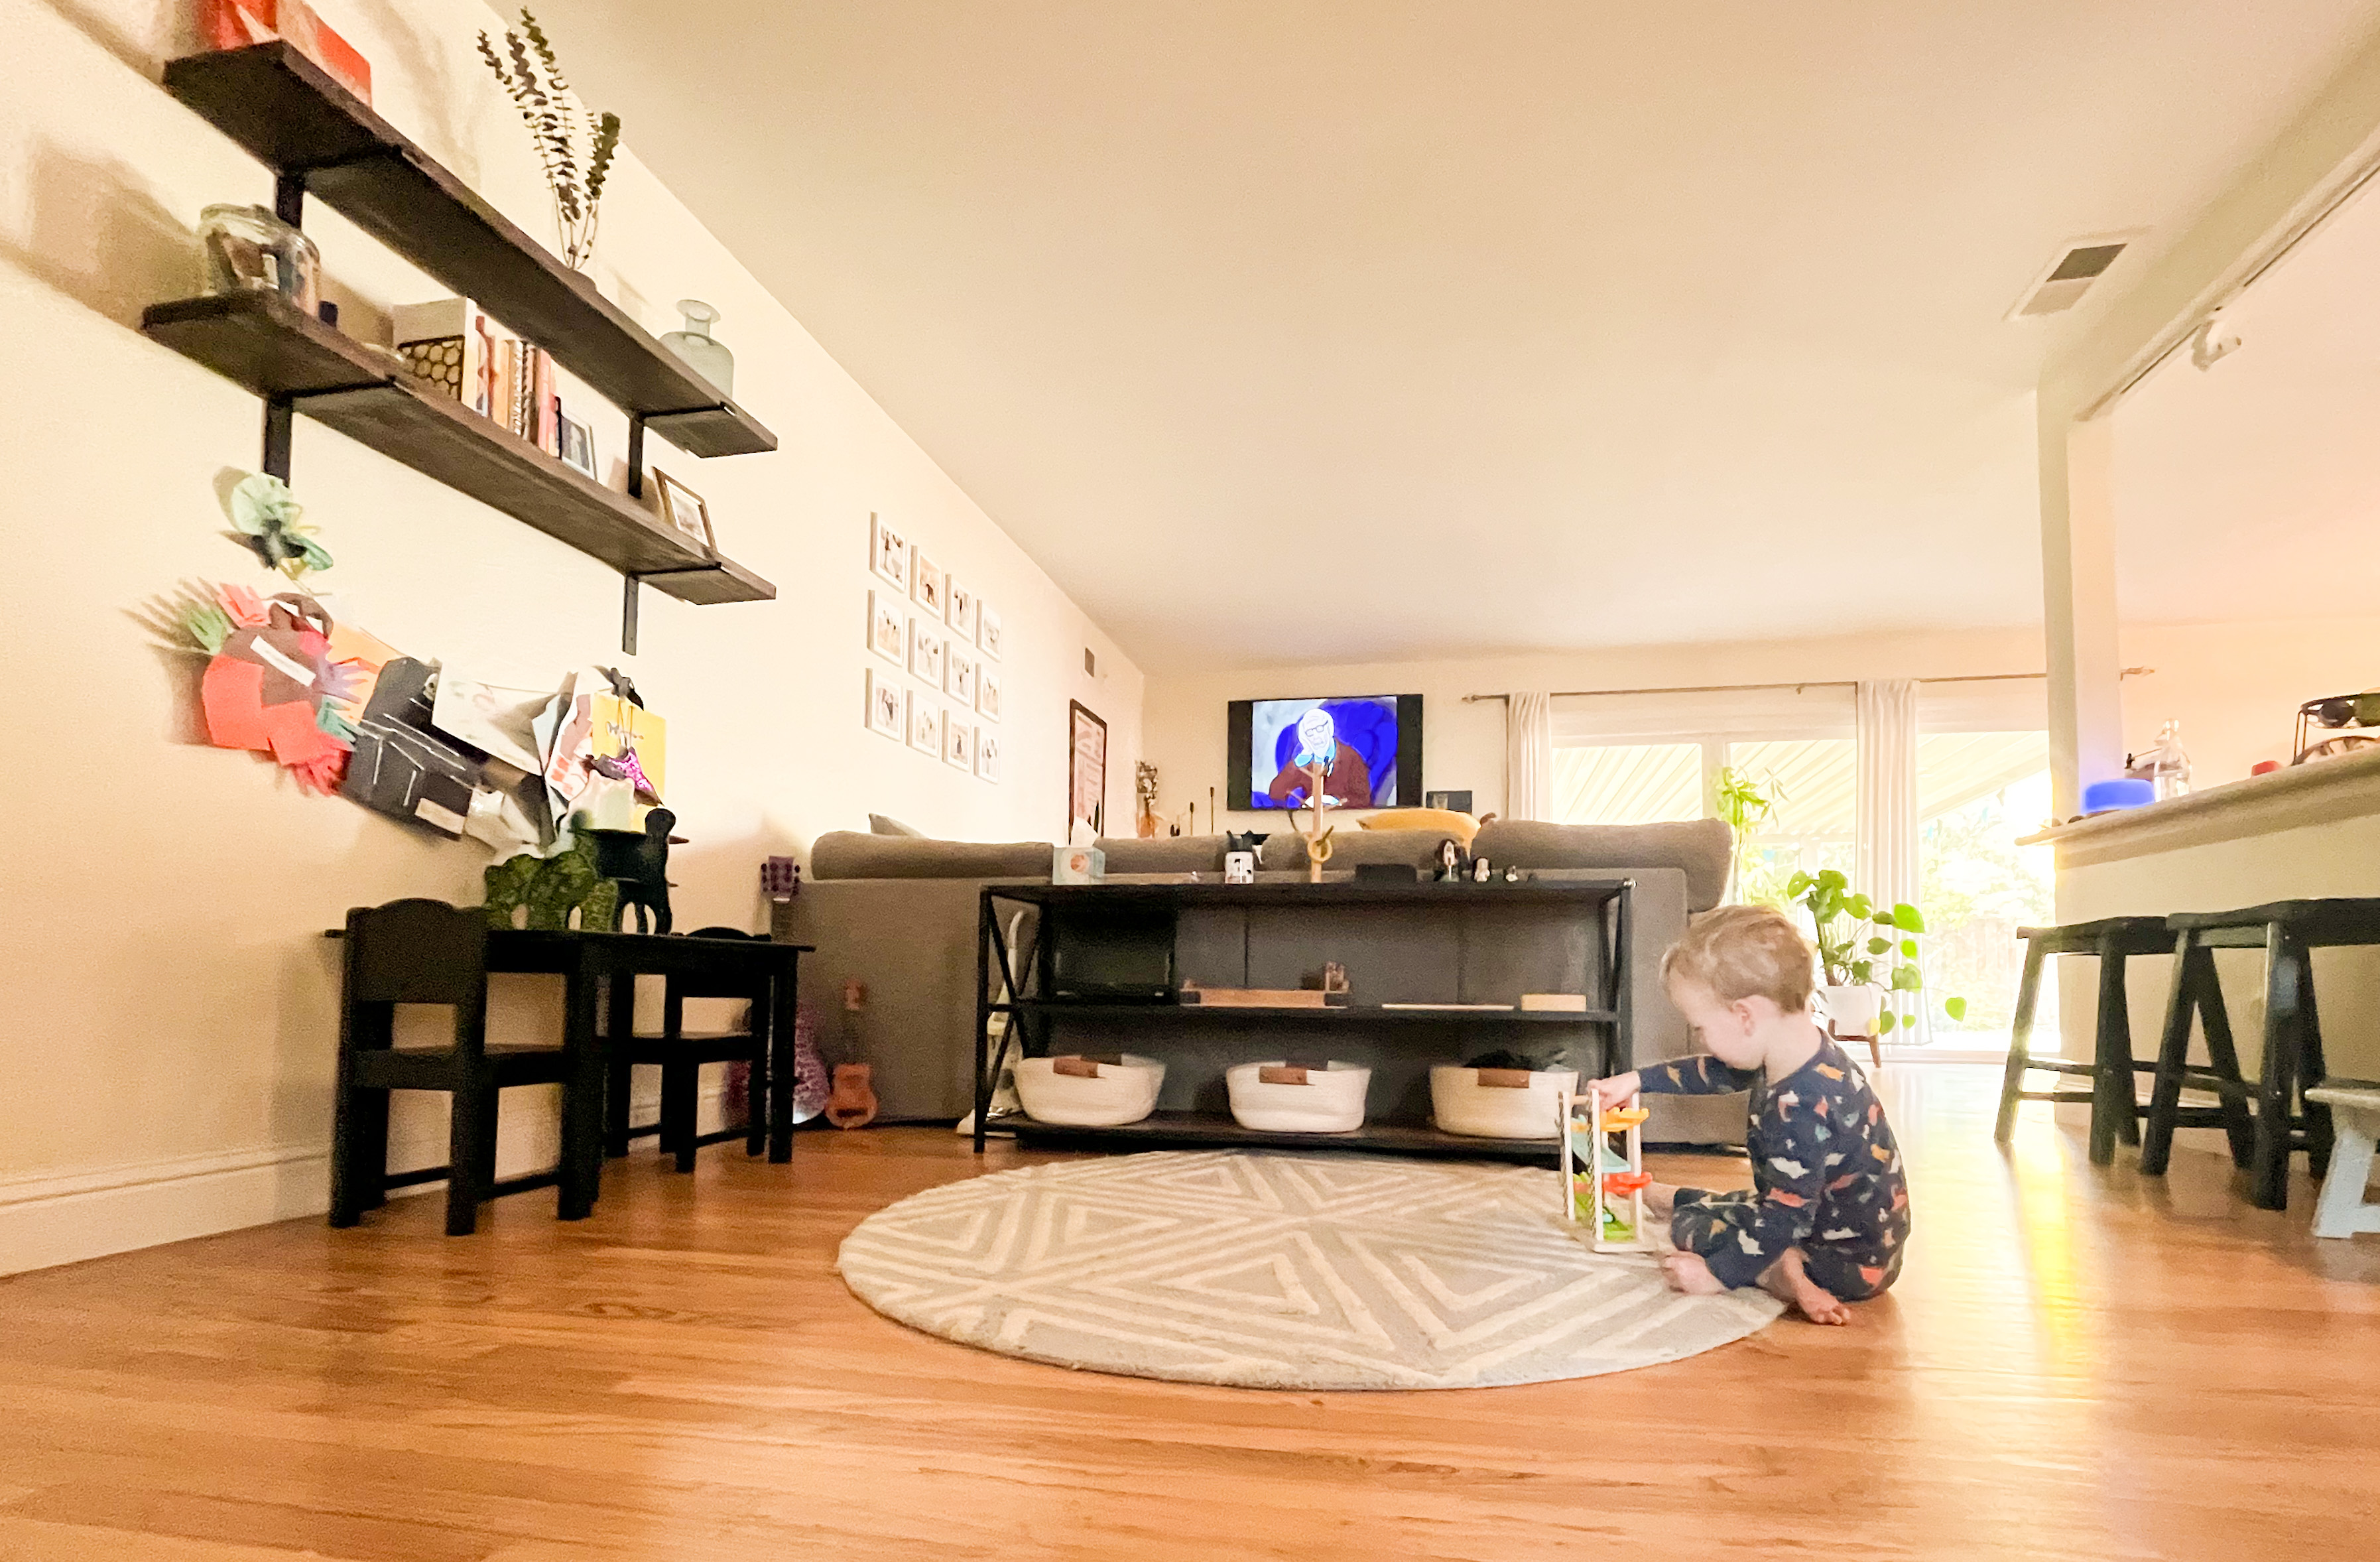
Things like a play kitchen that invites open ended and small world play are amazing & don’t have to rotate out. If there are toys that your children play with every.single.day don’t feel like you suddenly have to put them away for 3 weeks! For us there are a handful of toys we always have out: their pretend vacuum, guitars and a little bumblebee car they zoom around on. Those are the three things that are being used almost daily. Below is a picture of our actual toy space. In their rooms they don’t have any toys… Each boy has a basket of stuffed animals and a bookshelf.

Our actual toy space.

How often to rotate?

If the toys are off the shelf and on the ground in play you know your toy rotation is solid. When things start staying put on the shelf, switch it up. Or when items are being used for a completely different purpose (my kids in particular love to play “master disaster” and it’s where they just make a huge pile (read: mess) of their toys…. That’s usually a sign to me that they’ve lost interested in the toys that are out. When the dinosaurs make the switch from going on adventures to being part of the the master disaster it’s time to switch them out. That being said, rotating every 1-2 weeks is usually plenty. I will switch out puzzles more frequently because they may not hold interest for 1-2 weeks. The key here is to observe. Notice what your child is playing with or has lost interest in and adapt your rotation accordingly.

Where / how to store the toys?

Clear bins are my BFF for toy storage, I want to be able to see what is what so I can quickly switch toys out. Out of sight, out of reach, therefore out of mind, is best for toys not in rotation. At our old apartment I stored them in Wills closet which had a door. The boys closets in our new home are open, which does invite more pointing to toys from my two year old. But they are familiar with the fact that we rotate toys and if they really want something (I usually need to rotate anyway). Target has 6 packs of small bins for under $10 and i’ve used those to keep things organized. My goal for 2023 is to add more shelving to their closets.

Takeaways

  • There are no rules when it comes to toy rotations, so don’t get caught up on making it perfect.
  • Be clear to your kids that the toys are not being thrown away or going away forever. This should be a positive, fun experience. Frame it as creating a space for THEM to have the most fun and not to have to spend hours cleaning!
  • Categorize your toys the best you can & go from there. Remember to try to have a toy from each genre / category represented.
  • Enjoy the mental and physical space that removing toys will bring you.
J enjoying a new rotation 🙂

Johnathan’s 1 Month Photos

Can’t believe it’s been a whole month with this guy and in true second child fashion this post is going up 2 weeks after these photos were taken. This first month has been wonderful, Johnathan got to meet both sets of grandparents & William has fully embraced big brother duties. Johnathan also moved out of our room & into his own, but he’s still snoozing in his bassinet. Per usual time is flyyyying by, but we’re over the moon with our littlest man.

Postpartum Must Haves

Postpartum can be a roller coaster & anything you can do to make life a little easier or comfier is a no brainer. Below are 10 of my postpartum must haves this time around!

  1. After Ease drops – this tincture helps with afterbirth contractions that typically become more painful with each consecutive pregnancy. I added a few drops to my water before breastfeeding & I noticed a big difference when I used it versus when I forgot.
  2. Frida Mom Ice Maxi Pads – These are AWESOME. I know at the hospital they give you ice packs but i found these to work SO much better, colder, lasted longer – highly recommend.
  3. Cute Button Down Pajamas – It’s easy to feel really frumpy & gross postpartum, none of your clothes fit, you want to wear something comfy & easy to breastfeed in. Treat Yo Self & get yourself some cute soft pajamas, you won’t regret it.
  4. Heating Pad – I tucked this into my hospital bag. Depending on your labor you can definitely feel like you got hit by a train. Although my labor was significantly quicker & less dramatic this time around, once my epidural wore off my back was SO sore. I don’t know if it was from the epidural itself, or if it was from a way I was laying, either way a heating pad can offer relief if the advil just isn’t cutting it!
  5. Placenta Capsules – this is by far my top postpartum must have! I encapsulated my placenta my first pregnancy & did it again this time around. Although still not widely practiced here in the US, placenta encapsulation is extremely popular in Eastern Medicine – benefits include: replenishing Iron stores in your body, decreased postpartum depression, decreased anxiety, increased energy, increased milk supply. Last pregnancy I wasn’t certain that the pills helped, I felt good but I didn’t know if the pills were part of that. This time it was our second day home & I remember this feeling coming over me of just wanting to bawl. And I hadn’t taken any of my pills yet, Chris suggested I take one & see. Within two hours I felt SO much better. I felt like myself. Now I take 2-3 daily. I notice a boost in energy & mood when I take them. If you’re interested in encapsulating your placenta but don’t know where to start, I have found that often times doulas will offer encapsulation services!
  6. Nursing Tanks – I like these from H&M they come in a lot of colors / prints & are fairly affordable.
  7. A good water bottle – I personally couldn’t live without my hydroflask, I love ICE cold water so this bad boy serves me well. I’m never without it. When I’m breastfeeding I’m incredibly thirsty & it’s one of the best ways to keep your milk supply up.
  8. Nipple Cream – I used this nipple cream when I was breastfed William. A little 1oz jar will last you for so long.
  9. Hakka Pump – Breast pumps can be SO pricey – this little silicone pump from amazon is a great snag. It’ll run you under $15 & just put it on the opposite breast while feeding & it’ll catch the let down. However it’s not great if you have an oversupply of milk as it can cause your oversupply to be worse.
  10. Tap Light – this little light is one of my absolute favorites. In fact I often gift it to new mamas. It is super light weight, cordless, and can be dimmed & changed from warm to cool lighting. I packed it in my hospital bag this time & I loved having instead of having to turn on the aggressive hospital lighting. Once we’re home I keep it on my bedside table for middle of the night feeds & in fact we still use the one we got for William two years ago!

Johnathan Wade’s Newborn Photos & Tips for Taking Your Own!

Yesterday my bestfriend came over & we shot Johnathan’s newborn photos. We did this when William was a newborn too. Newborn photography can be costly & intimidating but they don’t have to be! These photos took about an hour all in all to shoot. Ideally you want to take photos in the first week or two when babies are the squishiest & easiest to pose & they tend to stay asleep through different positions. Below I’ll share tips for taking your own photos & the set up we used.

The Set Up

  • Boppy Pillow
  • Heating Pad – Be VERY careful with a heating pad. I placed it under a thick plush blanket & set it on the lowest setting, checking frequently to make sure it wasn’t too hot, I ended up turning it off completely.
  • Plush Blanket – something with texture is nice
  • Somewhere near a window with lots of light!

I put the heating pad over the boppy pillow, followed by the plush blanket I wanted to use. This blanket is extra special because my late aunt sent it to us shortly before she lost her battle to cancer one day after our son was born.

I positioned the boppy / blanket set up on our bed near a window that got plenty of afternoon light. But when I took William’s newborn photos the set up was on his rocking chair, near a window. The key is finding an area of your home that gets good natural light.

The heating pad helps keep baby nice & cozy & asleep. I use it when I’m taking photos when baby isn’t wearing anything but a diaper. As I mentioned previously, exercise extreme caution when use the heating pad, don’t use it above the first setting and check frequently the temperature!

Next up: Angles! I go by one simple rule: if you can see up the baby’s nostrils it’s not the best angle. You want to shoot the opposite way. Granted you’ll notice not all of the photos live by that rule but it’s a good thing to keep in mind while you’re taking photos.

Editing: Most photo editing apps have a lot of free features you can adjust. For newborn photos I usually follow these basic steps: Straighten the photo, increase exposure, decrease shadows, decrease texture & clarity. I use light room to edit all my photos so I’m also able to fiddle if I want to decrease any hues of certain colors. You’d be amazed at how much better a photo can look just by simply straightening it & adjusting the exposure.

If you’re on a budget, don’t want strangers in your home taking photos during a pandemic or are like me and can’t stomach paying hundreds of dollars for photos you can take yourself try out these tips!

Curaçao continued

I’m finally getting around to posting the remaining photos from our trip to curacao. Travelling has certainly changed now that we are bringing our little guy with us, but he was such a trooper. We were gone for 10 nights, took 5 flights, were in 2 climates & he totally rolled with the punches. He isn’t the baby that is just going to pass out on a flight & that’s okay, we just had to change our expectations that even if he’s tired the flight is probably just too stimulating for him to be able to nap for longer than 30-50 min at a time. Despite William not sleeping a ton on travel days, he was in such a good mood which made travelling with him a ton of fun. We booked this trip while I was still pregnant, granted it had a pretty flexible cancellation policy, but we figured if we waited till after we had him we may chicken out and not book it, rather than just planning on going! I think if travelling is something you enjoy than it’s completely possible to continue doing so with a baby. We may not have ventured off the resort as much as we would have, we have woken up far earlier than years prior, but we still had a great time & it was amazing getting to see our guy take in so many new things!! This week we are finishing up Christmas gifts, I’m working two more shifts & then we are heading to my parents on Friday for Christmas, I can’t wait! 

Newborn Essentials

I thought I would put together a list of a few things that we found ourselves Amazon Priming to our house in the first few weeks of having William home. Even though I thought I was well prepared to have baby come, I found myself realizing we really needed a few things I hadn’t thought of or I had under estimated how many of certain items I needed.

Night light – This is probably my number one recommendation. I LOVE this night light.After our first night home with baby I realized we desperately needed some kind of light, a quick Amazon search led me to this bad boy, with 4.5 stars & 1200 reviews, I had this at my doorstep the next day & have used it ever since. Not only is it wireless, ultra light weight & small, making it completely portable. You control it by merely tapping & when you hold your finger down the light brightens or dims. You are also able to easily toggle between both warm & cool. It’s perfect for late night feedings, providing enough light to change a diaper but not so bright it disturbs your newborn.

Changing pad covers – I had purchased a pack of 3 of these thinking oh that should be enough. No. It wasn’t. I went ahead and order two more packs of 3. In the first week Will had peed on the 3 we had & I realized unless I was doing laundry daily a pack of 3 wasn’t going to cut it. These are realatively inexpensive & you don’t have to feel guilty tossing one if a blowout happens.

Plain Onesies – We learned our son hates being hot. So all those adorable zip up pj’s I had stocked up on, paired with a swaddle made him way too warm at night. So I found myself using just plain long sleeve body suits. We still use them today, nearly 5 months out. They’re plain white or grey so if there’s a blow out I don’t think twice if I feel like I need to toss it. I also keep these in the diaper bag, or the car as a back up outfit.

Gripe Water aka life saver. Whether it’s hiccups that won’t quit, or colicky gas pains this magic liquid is amazing. I think it’s nice to have in your arsenal for days when warm baths, leg exercises, burping just doesn’t cut it.

Finger nail scissors – I was gifted these baby scissors at my shower by another momma. They make the incredibly intimidating task of trimming your babies nails manageable. With a curved design and blunted tip you can feel comfortable that you won’t accidentally cut those tiny fingers or toes.

Head scrubber– This little silicone scrubber is a great way to prevent cradle cap and to clean eczema prone skin! Initially we used a little hairbrush to clean Will’s head but he hated it. I found this handy tool on amazon & swear by it. There’s no more crying when it comes to scrubbing his head.

I think any of these would make for a great addition to a baby shower gift! Let me know what some of your must have items were!!


3 months

                               “

And just like that William is 3 months old. In some ways it feels like it has completely flown by & he looks huge to me & in other ways it feels like so much time has passed! It feels like forever ago I was pregnant, even though I still have the linea negra to show it wasn’t all that long ago! This month Will has started to grab at toys and pull them to his face, he’s getting more comfortable at tummy time & everyday seems like he’s finding a new part of his voice. Last week he discovered he could scream(!!). He continues to sleep through the night (bless him!). & he’s taking 2-3 naps per day. He’s also becoming a lot more aware of our dog & cat & has taken to petting/grabbing Juno’s fur. He’s our happy little guy & everyday I love him more!

Below are a few outtakes from his 3 month photos!

7585750448_img_8794